My latest project required me to use the Laravel framework and use a MSSQL Server backend. To do this, I will be using Windows Server 2012, IIS, and MSSQL Server 2012.
Installing IIS
First thing is make sure every thing is up to date. If it’s a brand new server, you will need to install and configure IIS.
- Under Server Roles, select Web Server (IIS).
- Look for CGI under Web Server / Application Development.
- We will leave everything else to default values. Just continue to the next windows until it starts to install. Check and see if there are any updates after you install IIS.
You need to install an extension called URL Rewrite. You can find details at https://www.iis.net/downloads/microsoft/url-rewrite. The download link is at the bottom. Select the x64 or x86 depending on the architechture you are running.
PHP
- PHP 7.0: We will be using the x64 Non Thread Safe version since we will be running PHP in Fastcgi mode. Unzip this into C:php. You can name this whatever you want. I usually leave version numbers as part of the folder name just in case I need to upgrade or run different versions. It’s your call on what to name it.
- You will need to copy either the development or production .ini file and save it to C:Windows. Because of its location, you many need to run your text editor (like Notepad) with admin permissions every time you need to make changes to the file. Here are the changes.
- extension_dir = “ext” (enable this if you’re going to use extensions)
- fastcgi.impersonate = 1 (enable this)
- cgi.fix_pathinfo=1 (enable this)
- cgi.force_redirect = 1 (enable this)
- Download the MSSQL driver for PHP. I will be using version 4.0 for this guide. Extract it to a folder. Look for the file name php_pdo_sqlsrv_7_nts_x64.dll and move it to C:phpext folder. Rename it to php_pdo_sqlsrv.dll.
- You will need to install the ODBC driver to work with the SQLSRV driver above. Since our OS is 64bit, use that version or you may get an incompatible error during install if you try to use the 32bit version.
- Optional: You can add the PHP executable to your environment variables. Just add C:php. By doing this, you can use the php command throughout Command Prompt. You can test it by running php -v command and it should show you the version of PHP you are running.
If you encounter the VCRUNTIME140.dll is missing error, please download the component from https://www.microsoft.com/en-us/download/details.aspx?id=48145. Again, I used the 64bit version to match what I’ve installed so far.
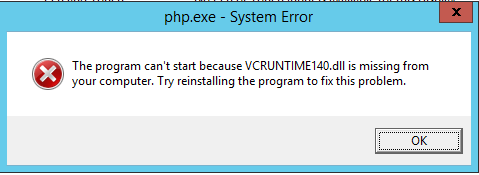
Back to editing the php.ini file. Enable the following extensions in your php.ini file.
- php_mbstring.dll
- php_openssl.dll
- php_odbc.dll
- php_pdo_sqlsrv.dll (Please note, this is not in the ini file and you will have to add it.)
Save the file.
Configuring IIS
I have posted a guide on running WIMP (Windows, IIS, MySQL, PHP) and I’ll be using the settings from this guide as well here. Now we need to let IIS know how to serve PHP pages. Open up IIS Manager. Highlight the entire Server to apply to all websites hosted or specific ones – in this case, highlight Computer/Server name below Start Page. Next, double-click on Handler Mappings and Add Module Mappings. Here’s how mine looks.
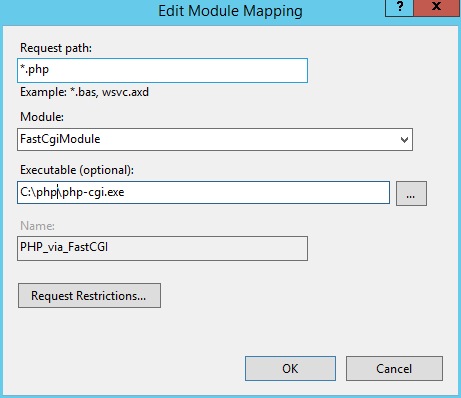
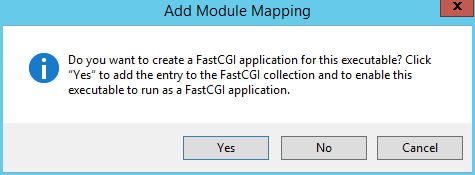
You will then be asked if you want it to create a FastCGI application, yes.
That should be it for IIS for now.
Composer
If you don’t have Composer installed, do so now by using the Windows installer from their website. This application requires openssl, which is why we enabled it during the PHP configuration. You can test the installation by running composer about in the Command Prompt.
NodeJS
If you don’t have NodeJS installed, do so now by using the installer from their website. I’m using version 6.0+ and the 64bit flavor for this article. This is optional and is not a requirement to run Laravel applications but it makes things easier. You can test the installation by running node -v and/or npm -v.
Create New Laravel Project
Use composer to create a new project using Laravel. Go to a folder where you’d like to store projects then run the following command.
composer create-project laravel/laravel test
Composer will pull all the dependencies down and create a new project inside the test folder. Once completed, right-click on the test folder and select Properties. Under the Security tab, add IIS_IUSRS and IUSR with the following permissions.
- Read & execute
- List folder contents
- Read
- Write
It should apply throughout the subfolders as well.
Run Notepad as administrator and open C:WindowsSystem32driversetchosts. In Notepad’s Open dialog window, make sure you have All Files (.) selected or you won’t see this file. At the bottom of the file, add the following entry.
127.0.0.1 test.dev
Back to IIS, we will Add Website. The Site name and Host name that I used is test.dev. The Physical path is the public folder of the application.
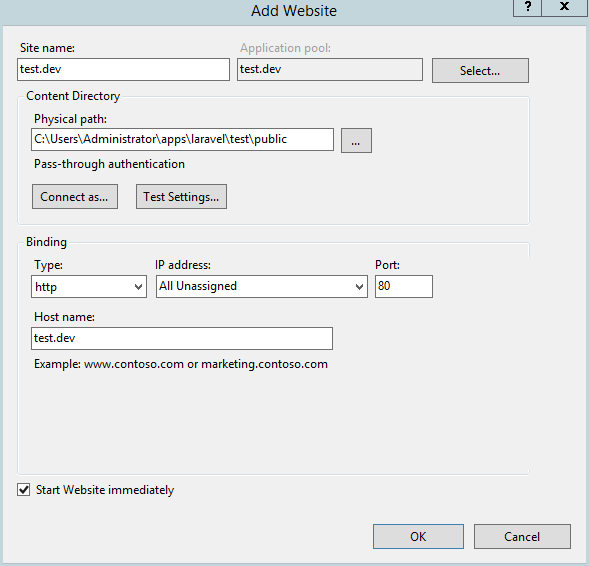
Check if the web.config imported the values in .htaccess found in the public folder. While the new website, test.dev, is highlighted, look for URL Rewrite and open it. If you don’t see imported rules, just import the rules from the .htaccess file.
Finally, open Default Document and add index.php. You should now be able to view the default Laravel home page by visiting http://test.dev in your browser.
You can test the URL Rewrite by adding the following code to /routes/web.php.
Route::get('/about', function() {

return 'hello world';

});
Then visit http://test.dev/about. You should see “hello world”.
MSSQL Server 2012
For this article, I am using MSSQL Server 2012. Open /config/database.php file. Change the default value from mysql to sqlsrv. Add the following connection.
'sqlsrv' => array(

'driver' => 'sqlsrv',

'host' => env('DB_HOST', 'localhost'),

'database' => env('DB_DATABASE', 'forge'),

'username' => env('DB_USERNAME', 'forge'),

'password' => env('DB_PASSWORD', ''),

'prefix' => '',

),
Open the .env file and provide your database credentials and information. Create the database in MSSQL server. If everything works as they should, you can run the php artisan migrate command in Command Prompt and it should create the migrations, users, password_resets tables in the database.
That should do it. You now have Laravel app with MSSQL database backend running in IIS and Windows Server.
Leave a Reply